
Blushing little polymer clay doll with Genesis heat paints

My little polymer clay, press mold doll is complete.  Now I need to make her look life-like by painting her face and blushing her skin. Although polymer clay can be painted using acrylic paints, I decided to paint this doll using Genesis heat set paints.. I ordered these paints about 4 years ago from a shop online.  They were sold as a kit for painting "re-born" baby dolls, but many polymer clay OOAK artists use these paints to set their work permanently onto the polymer clay surface.  Even though I bought these paints several years ago, they will not dry out and a very little amount is needed to paint the doll.

In this picture, I have my tiny paint brush in the pot of Genesis glaze.  I painted the doll's eyes with the clear glaze before I added a tiny amount of blue to create her irises.


 In this series of pictures, I added and wiped off the red for blushing and lips.  I also added a tiny amount of burnt senena to the red to soften the color into a more naural blush.  The lips were difficult, because of their tiny size.  I had to add and remove the color over an over until her lips were a soft shade of red.


Pin It
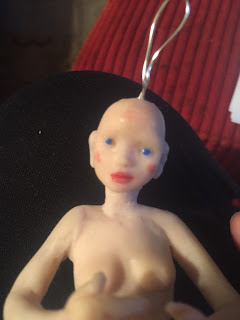
I blushed her tiny body in areas that would normally be in shadow, if she were a real person.  I added color to her forehead, cheeks, breasts, knees, elbows and underarms.  I rubbed off the color with a paper towel after applying it so that the color was muted and not stark.  I added a tiny amount of brown to her iris to create a pupil.  I also drew very tiny eyebrow and a trace of brown where her eyelashes would be.  Her face is only the size of my thumb nail, so each place I painted had to be carefully done.  Once I was finished, I placed her in a cool oven at 250 degrees for 10 minutes to set her paints permanently.

I think she turned out very pretty.  It is interesting how much a doll's personality comes out once her face is painted. 

If you have any questions or comments, please feel free to add them to this post. Thank you for reading.

Comments

Popular posts from this blog

Gluing Mohair onto a Tiny Polymer Clay Doll’s Head

                       Today I am going to show you how I glue mohair onto a tiny doll's head.                      Firstly, I add a small amount of glue to the back of the doll's head.  I use tacky glue by Aleen.                                                 Next, I cut a tiny amount of locks from the mohair skin.  This is a piece of mohair I ordered several years ago.  It may actually be Tibetan wool, because it is attached to a piece of skin, but I truly am not sure.  I have locks from a friend's sheep that I will be dying in the future to post on this blog.  The new locks are shaved from the animal, which makes me feel better about obtaining sheep locks.  Of course, this is just a preference I have now....

How I Fixed My Broken Basaak Blythe Doll

Last week I received a Basaak Blythe clone in the mail.  I bought it from a man who was selling a couple of dolls that he had inherited from a friend who customized Blythe dolls.  He didn't give any more information except to say he priced it according to the other dolls for sale on that site, and that he did not know anything about dolls.  Well, she was $25, and I know about dolls.   I bought her immediately.  I was well aware that she would be broken when she arrived.  Her legs were not attached, and she was missing a green eye chip.  This didn't matter to me, because I knew I could fix her. After spending hours online learning about Blythe dolls and Blythe clones, I knew I could buy replacement parts.  The seller stated that he believed the missing eye chip was inside the head, because he could hear it rattling.  He didn't, however, explain the actual problem with the legs.  He only posted a picture.  I took a chance, ...

Resin Casting Hand Sculpted BJD in Hand made Silicone Molds